Friday, April 4, 2014

The Best Laid Plans of Mice and Men Often Go Awry


Catching up for time lost...
It was sometime back in January when I first noticed a pain in my leg.  I thought I pulled my hamstring – though I was unsure how it happened.  I wasn’t comfortable, but I muddled through some sewing completing most of what I wanted to accomplish for January.
Then February came along.  And March.  Now it’s April.
After two primary care visits, some unsuccessful traditional physical therapy, an MRI, and a visit to a Spine Center, it was determined that I have a herniated disk in my lumbar back.  Here is my MRI to prove it! 
 
Sorry for the poor resolution.  The healthy disk are white.  I added a red arrow to designate the herniated disk extrusion.  That “extrusion” is narrowing the passage for my nerves and causing radiating pain from my butt to my ankle.  It was often like having a really bad charley horse that you can shake off.
Sewing was pretty much out of the question during much of this time.  Sitting down is one of my pain triggers, and often I could barely move.  I walked more similarly to an 85 year old woman than a 36 year old.

Now I am going to physical therapy twice a week at the Spine Center and I seem to be on the mend.  I hope to get back to a more regular sewing schedule now that I feel like I can move around.
But the issue is that I had so many plans for things to make in February and March, so I feel like I am so far behind schedule.  Hopefully, I can start getting caught up because while I sat around for 2 months, I came up with a lot more ideas!

Look for at least one new item to be posted this coming weekend!

Happy Sewing!
Michelle

Tuesday, February 11, 2014

A Hit and A MIss

To finish my posts about January completed projects, I will include 2 items in today’s post.

First, the HIT!
Late last year, I decided to take my wardrobe options to a new level – I was going to learn to knit.  Okay, so it’s not a huge stretch for me since I already know how to crochet.  I started snooping around Raverly and discovered a set of patterns for beginners from Tin Can Knits.  There are 8 patterns in The Simple Collection and the best part - they are free!   happened to have a skein of 100% wool hanging around, so I started with the first project, the Wheat Scarf, in December.
The other 7 patterns in The Simple Collection include a baby blanket, a hat, a cowl, socks, mitts, a pullover sweater, and a cardigan.  Child through adult sizes are included for all the patterns.  Not only was the pattern great, but the tutorials are also extremely helpful!  There was not a step that was not covered in detail!  And the final result?

It's not perfect, but I really can't complain for being my first knitting project. 

  
I was so inspired by my first finished knitting project that I have ventured onto bigger and better projects in the world of knitting.  Stay tuned for a another finished project sometime in March!
And now THE MISS!
I saw this wrap dress on BurdaStyle and thought it looks super cute.  It would make a perfect swimsuit coverup!  Bonus #1 - The pattern is free!  OK, so there really isn't a pattern, just instructions telling you cut 2 rectangles and sew them together.  Still, it is FREE!  Bonus #2 - There are several ways to tie the finished fabric into different styles of dresses.  Basically, you could have 3 dresses by just sewing one!

 
The instructions for inserting the elastic for the neckline were a little confusing.  Here a look at how I pinned the elastic before I sewed it down, then turned it, and sewed it the second time.


  And the result - an utter disappointment.  I am small.  I made the smallest size.  I tied it using the View B Variation.  The fabric is not long enough to tie in the back!  Here are some pictures on my mannequin to give you an idea.


So, I tried View A, Variation 1.  I was still not able to tie it together.  Closer, but no go! 


I was able to make it work with 2 possible dress ideas - See below.  However, the first one has a waterfall of fabric sticking out from the bust - really not attractive.  Lighter fabric could make this better.  For the second dress, I just tied the ends together and put it around the neck.  It looks okay, but it is not what I was going for.


Maybe making a larger size would create the look I am desiring, but it will have to wait. 
 
Instead you will probably be seeing this fabric again in a different project in the future.  Luckily because you only cut one slit for the neckline, I have plenty to work with. 
 
Did anyone have success with this pattern?  Anyone else have issues?
 
Happy Sewing!
Michelle

Thursday, February 6, 2014

Matching Robe and Nightgown

Burda 7627 View D

Burda 3379 View B (OOP)


I started this set in December, hoping to finish by Christmas so that I would have something other than knit active wear to wear as pajamas over the holidays.  I set out to make a long nightgown and a full length robe – feminine, fashionable, but still providing coverage.
 
The holidays came and went.  The project was finally completed mid-January.  (I'm trying to get caught up posting my completed projects - hopefully by the beginning of next week I will be current!)

I purchased the fabric from Hancock Fabrics, a matte polyester “silky” fabric in royal blue.  The nightgown was first as I had completed this pattern (Burda 3379 View B, now out of print) several years ago to be used a black slip under a couple dresses.  The made a few changes to the pattern including adding about 12 inches in length and cutting on the bias rather than straight grain.  Due to the bias cut, I removed about 1/2" in width from each seam from my armhole to the bust dart.  All the seams were sewn using French seam technique.  The top detail of the bodice encases the top edge and eliminates any facings.


On the robe (Burda 7627 View D), I also added to the length.  The length added was about 18 inches since I wanted a full length robe.  I ignored the lace detail along the front, but instead created a detail similar to that on the nightgown so that they would truly match.  The detail on the robe is 2 inches wide when finished. 


Similar to the nightgown, this detail encased the raw edges along the front and neck, eliminating a different finishing technique.  Also like the nightgown, the seams were completed using french seam techniques.


Purchases for this project (all purchased in 2013):

Fabric                    $15.26                  4 yards @ $3.81, Hancock Fabrics (Robe)
Fabric                      $8.48                  2 yards @ $4.24, Hancock Fabrics (Nightgown)
Thread                    $1.29                  
Pattern                   $2.67                   Burda 7627

Already in stash:
Interfacing                                         
Pattern, Burda 3379

Total cost for this project:  $27.70


Check back for more finished January projects later this week!
Michelle


Monday, February 3, 2014

BurdaStyle 01/2012 #106


Wow!  I actually got so much sewing done in January.  I just wasn’t able to get photos of my garments until this weekend.   The polar vortex has put the kibosh on outdoor pictures, especially in Minnesota.  Plus, we are still dealing with limited hours of daylight, so by the time I get home, the lighting is just horrible.

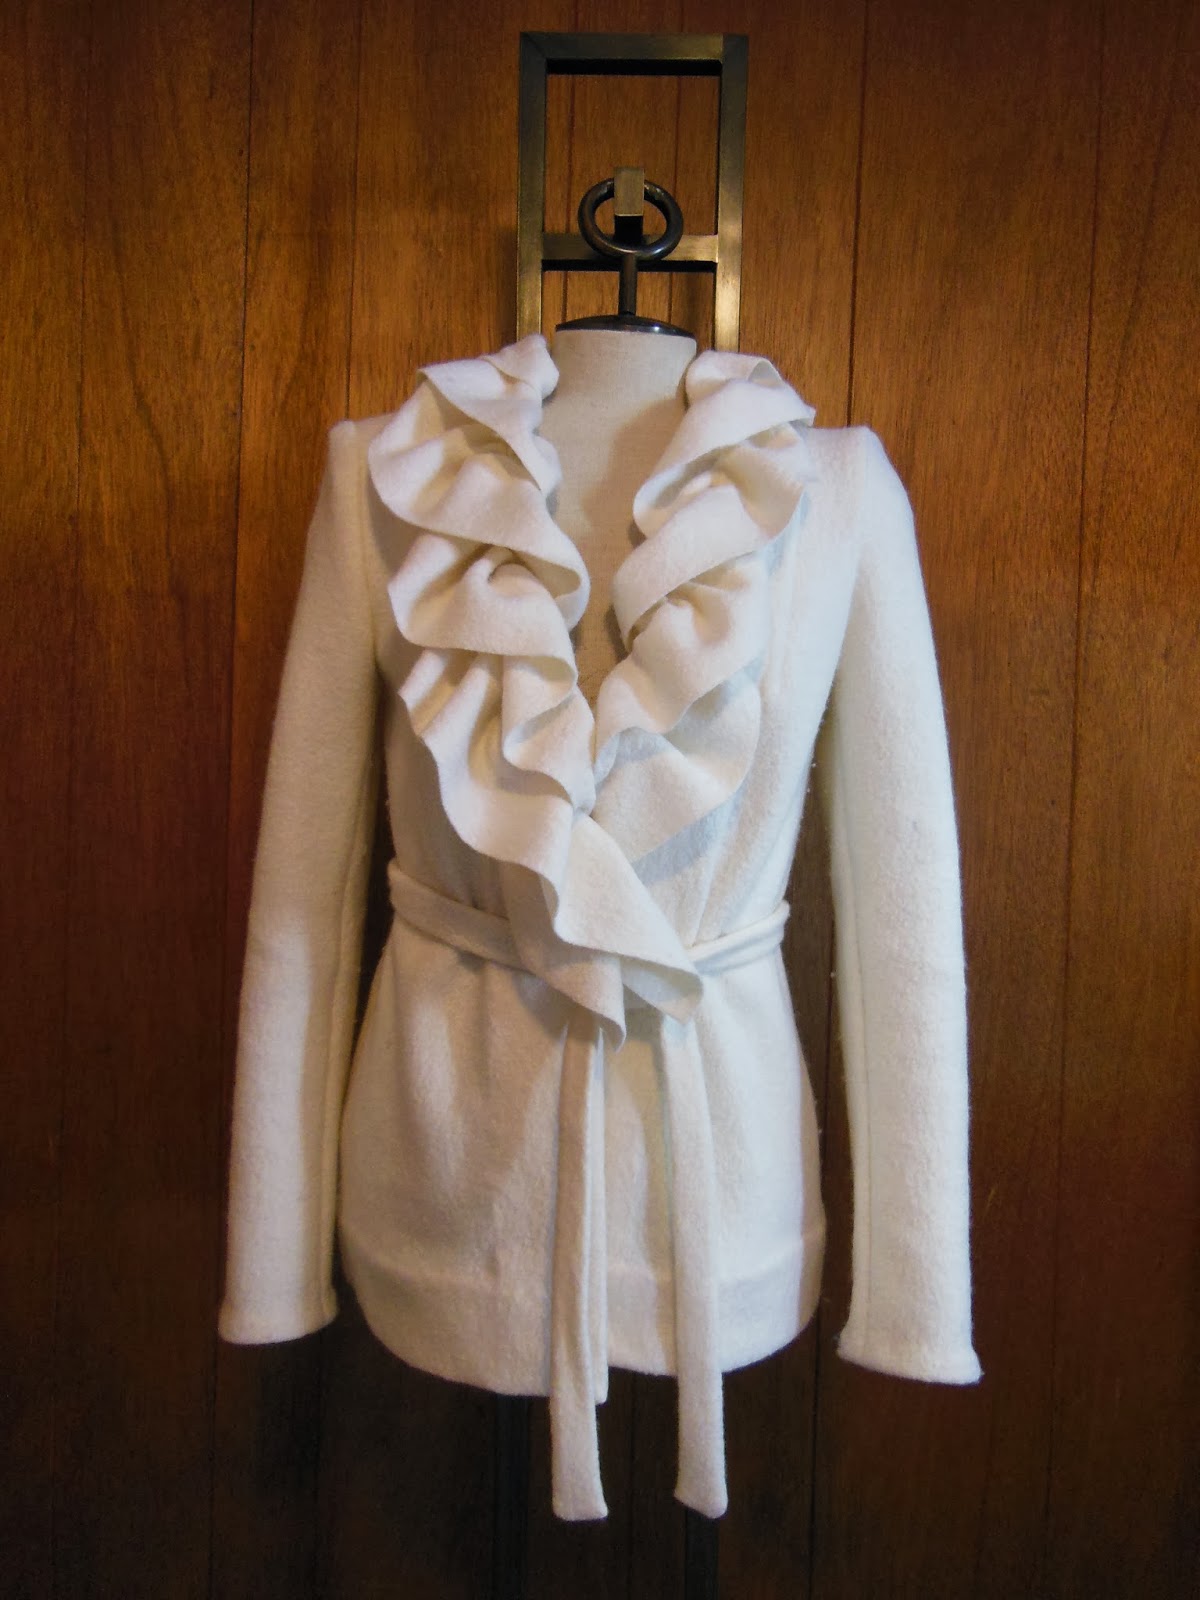
So on with it – This is actually my only non-UFO item that I completed in January.  I had been eying this pattern for a while, looking for the perfect fabric online.  I wasn’t finding much in the color palette or the price range I wanted.

Over my lunch hour one day, I was wondering around JoAnn Fabrics and noticed that their Simple Luxury Collection was 60% off.  AND I had a coupon for another 25% off my entire purchase!  I spied this off-white wool blend boucle knit (regular price $39.99 / yard) and knew that it would be a great fit.

The fabric was wonderful to work with Since it was a knit, it was not going to fray, but I wanted the inside to look "finished."  So, I finished all the seam allowances with a hong kong finish.  I didn't have quite the right color for the binding, but I found a cream on cream calico in my stash that the reverse matched quite well.


The only change I made to the pattern was to eliminate the seconf row of "frills" from the collar.  I had them on originally, but found that the fabric was a little to thick to accommodate 2 frills.  You can see the jacket with 2 frills attached in the picture below.  Too much, right?


And here I am modeling the final product.  I have worn it twice already.  I love that I can wear it casually with jeans or dress it up with a skirt.


One great thing about this pattern was that there were actually 3 different options:
 
 
                      BurdaStyle 01/2012 #107 - Ruffle Neck Coat
 

Lastly, since I am tracking how much I spend on my sewing projects during 2014, here are the details of this project:
 
Fabric                    $29.99                  2.5 yards @ $11.99, JoAnn Fabrics
Pattern                      5.99                  BurdaStyle.com 01/2012 #106

Already in stash:
Cotton calico for binding   
Thread                                      

Total cost for this project:  $35.98
 
Happy Sewing!
Michelle


Monday, January 6, 2014

2014 RTW Fast

 
That’s right!  I have vowed not to buy ready-to-wear clothing between the dates of January 1 and December 31, 2014.  Of course there are a couple of exceptions – shoes, socks, and underwear can be purchased.

To tell the truth, it’s not like I usually purchase a lot of clothes throughout the year anyway.  A couple years ago, I tried on EVERYTHING in my closet and only kept the items that I truly loved to wear and had a spectacular fit.  It was hard letting go of certain items because I knew how much I spent on them or because I felt like I got such a great deal, but in the end it was TOTALLY worth the pain.  I may have fewer clothes, but I never have a time when “I have nothing to wear.”  My closet now only has things I love to wear.  And when I go shopping now, if the fit isn’t 100% right, I don’t buy it.  So, the end result is that I buy fewer items, but they get worn a lot more.
Furthermore, I am adding a couple of additional limitations to my RTW Fast.

1.      I will complete at least one “NEW” wearable garment per month.

2.      I will complete at least one “UFO” wearable garment per month (unless I have none remaining – haha!)

3.      I will not spend more than $1000 in total during 2014 to compete the garments.  (This does not include anything already in my “stash”, but does include anything I purchase to complete UFO projects as well as new ones.)
Don’t forget to check out some of the other 2014 RTW Fasters as well!
Michelle

Thursday, January 2, 2014

Project from the Past – Wedding Dress (2003)

10 years (and a couple months) ago, I married my best friend.  There was little doubt that I wanted to make my wedding dress.  (I also wanted to make the bridesmaid dresses, but knowing my procrastinating tendencies, my dad put the kibosh on that.)

I wanted to share my dress with you.  It was actually 2 pieces, a separate top and skirt.
 
 
As I prepared for the big day, I tried on many dresses, but I had a hard time getting a decent fit due to my long torso.  I found that the 2-piece wedding dresses were better, but the tops were still not long enough for me.  My inspiration was a Maggie Sottero dress that I can not find a picture, but had some of the same features as this one.  It was a two piece gown with blue beading on the corset top.  It did have the one-shoulder tulle detail.

I started with McCalls 3853 (now OOP).  I used the pleated skirt pattern with zero alterations.  For the top, I first made a muslin from the corset pattern, getting a perfect fit.  Then I added a seam under my bust to all the front pieces so that I could attach my tulle along that seam on the final top.  I also adjust the bottom front of the bodice so that it had a smooth curve rather than the sharp “V” of the pattern.

The purchased my fabric from Ginny’s in Rochester, Minnesota.  The majority of the dress is 100% silk dupioni in an off-white color.  The bottom portion of the front of the bodice, along with the fill bodice back was the same silk, but all-over embroidery. 
I lined the skirt with black-out drapery lining for 2 reasons.  I loved the heavy weight of the lining to keep the pleats looking full.  The second reason was because I made my crinoline using dark maroon netting, which I wanted to peek out when I walked or danced, but not show through the silk skirt in pictures. 

 
The top was lined and then I added an interior bodice made from power net.  Even though the top had a strap over one shoulder, I really did not want there to be any stress on this detail, so the bodice was made to fit me as if it were strapless. 
It was a huge accomplishment for me to complete this dress.
 
Maybe you have noticed that I speak of my wedding dress in the past tense.  The reason is because my dress was taken to the dry cleaners and they shrunk my dress.  The outer skirt was 2 inches shorter than the lining and the bodice barely covered my midriff.  This was not noticed until I visited my parents’ home where the dress was stored several months later.  Since the dress had served its purpose, I really had no qualms about just trashing it.  So, it is buried in some landfill in Northern Illinois at this time.
 
Maybe I also did not have any issues about disposing of the dress because I still had some significant yardage leftover.  Someday I will finally get around to making something more versatile with the fabric.  I’ve even considered dyeing it another color.  Nothing has called to me yet, so it sits for now.  But when I decide to make something, it will even better.  I promise.   
 
Michelle
  

Tuesday, December 17, 2013

A Matching Dress


I had been eyeing the Sugar Plum Dress from Lolita Patterns for a while.  In fact, I even purchased the Houndstooth Kit, which included the pattern, a polyester hounds tooth print for the bodice, a lycra-blend gabardine for the skirt, a zipper, and buttons.  It arrived beautifully packaged and I was looking forward to a new dress.


However, once I had my cape completed, I had some decently sized scraps leftover.  I decided that a matching dress to the cape would be perfect and the Sugar Plum pattern would be an impeccable accompaniment.  I haphazardly placed the pattern pieces on the scraps and decided that it was definitely doable with some careful pattern cutting.

The finish dress exceeded my expectations.  I did add 1 inch to the bodice length, which is almost always necessary to accommodate my long torso.  I made a size 6 top and the waist is size 6, but the skirt is graded to a size 10 at the hips. 


 A also made a couple other changes - I lined the entire dress and I added a kick pleat. 
(Sorry the picture below makes the lining seem so wrinkled.)


Overall, I am very pleased with the result and I already wore the dress and cape combination to an annual family dinner in downtown Minneapolis.  I'm looking forward to wearing it this week to work also!  Now to decide whether to make another Sugar Plum Dress using the Houndstooth Kit I purchased or to find another pattern for the fabrics....
 
Until the next project,
Michelle

18 Years and 8 Moves Later...

I finally cut into my 4 yards of Pendelton wool. I purchased this fabric way back when I worked at House of Fabrics while I was still in high school.  1995!

I bought it for what even I considered a steal - on clearance at 19.98 per yard.  As you can see, I started my fabric stash at an early age.  I had no idea what I would ever make with it, but I HAD TO HAVE IT!  So I bought the last remaining 4 yards on the bolt.

Life goes on and the fabric goes along.  I went to college in Minnesota (I grew up in Illinois) and the fabric went with me.  After college, I moved a lot.  The fabric made every move with me.  Finally, after hanging in the closet for the last 8 years at our house, I had found THE PATTERN! 


It was perfect!  The pattern calls for 4 1/2 yards of outer fabric, so I figured I could just shorten the cape a bit to make up the difference.  Now to get some equally fantastic fabric for the lining.

I was at the local Joann Fabrics and the linings were so BLAH.  Then I just happened to walk through the silky prints and VOILA - there it was calling my name!


So after the kids would go to bed at night, I would head down to the basement to do some sewing.  I even managed to find time on the weekends that I could spend working on it.  And now it is complete.


Of course, my little buddy wanted to be in the pictures also.


Also, an update on Christmas Gift #1 and #2, which were sent to my parents in Arizona.  I had them open their gifts early and they loved them! 


Until the next project,
Michelle
 

Tuesday, December 3, 2013

Christmas Gift #2

So, I have to confess – I actually worked on this project during my lunch hour over the last month.

 Christmas Gift #2 COMPLETED!


This is a free pattern:
http://www.yarnspirations.com/pattern/crochet/peacock-feathers-afghan

To match Christmas Gift #1 Afghan, I again used Red Heart yarn.

 
I love the detail stitch in this pattern.  I might even consider making another for myself!

Michelle

Monday, December 2, 2013

Week 6 (November 22 - 28, 2013)

Rather than breaking down each week – let me just say that I have been busy! 

 Christmas Gift #1 COMPLETED!


I crocheted a cozy blanket using Red Heart yarn.  As much as I hate acrylic, it does have its place in a blanket that will be washed over and over again!  This blanket will hold up for many years to come.


I didn’t follow a pattern, but I did this basic sequence:
Row 1: Double crochet every stitch, back loop only
Row 2: Single crochet every stitch, front loop only
Row 3: Double crochet every stitch, back loop only
Row 4: Single crochet every stitch, front loop only
Row 5: Double crochet every stitch, back loop only
Row 6: Skip stitch, triple crochet in next two stitches, triple crochet in skipped stitch, repeat

The edging was from a pattern:
http://www.yarnspirations.com/pattern/crochet/peacock-feathers-afghan

I am making this Peacock Feathers afghan for another person of the same household and I thought that having the same edging on both blankets would be a nice touch.
 
Until the next project...

Michelle

Friday, November 1, 2013

Week 2 (October 25 – 31, 2013)


Here is this week’s breakdown:

Friday                   1.5 hours crocheting (No pattern, Christmas Present #1)
Saturday              2 hours sewing (Cape, BurdaStyle 08/2013 #122)
Sunday                 1.5 hours crocheting (No pattern, Christmas Present #1)
Monday               1.25 hours crocheting (No pattern, Christmas Present #1)
Tuesday               30 minutes crocheting (No pattern, Christmas Present #1)
Wednesday         15 minutes sewing (minor alteration to son’s Halloween costume)
                           1.25 hours crocheting (No pattern, Christmas Present #1)
Thursday              2 hours crocheting (No pattern, Christmas Present #1)


I found a lot of extra time to work on my projects this past week.  Crocheting is my go-to project when I just want to sit on the couch for a while.  I can still listen to the television and look up just in time to catch anything interesting.  Of course, I still have to wait until the kids go to bed before I start.
My husband and I were also very fortunate to have a new babysitter at our house for a few “training” hours on Saturday.  The sitter comes to our house and is 100% in charge of the kids, while my husband I do other tasks.  We are available if they need anything or have questions, but generally we are hands off and the kids even forget we are there.  So that allowed me to spend 2 hours on my sewing that I may not been able to otherwise.
Michelle

Friday, October 25, 2013

Week 1 (October 22-24, 2013)


No reason a week needs to start on a Sunday, right?

Here is this week’s breakdown:

Tuesday               1 hour crocheting (No pattern, Christmas Present #1)
Wednesday        30 minutes crocheting (No pattern, Christmas Present #1)
Thursday             1.25 hours cutting fabric and lining (Cape, BurdaStyle 08/2013 #122)

I am purposefully being vague about what I am crocheting.   I promise to take pictures and post them once I know the gift has been opened by the lucky recipient.

Also, this week has been feeling less chaotic, so I was able to find more than just 20 minutes each of the days to work on my projects!

Michelle

Tuesday, October 22, 2013

"Normal"

2 Full Time Working Parents
2 Young Kids
Meal Planning, Grocery Shopping, Cooking
Laundry, Laundry, and More Laundry
Home Improvement Projects Galore
 
Too much to do, not enough time…This has become to “normal” for us.

I started to feel that I wasn’t doing enough for “me.”  I wanted to spend more time creating – sewing, crafting, etc.  I wanted to get back into making things that make me happy. 
 
Since watching television is not really rewarding to me, I have decided to trade some time every day that I would have normally spent on the couch.  I decided on 20 minutes.  20 Minutes Every Day.
 
Initially 20 minutes didn’t seem like enough time to get anything accomplished.  But longer than 20 minutes seemed like a huge commitment to add to my already busy life.  And I thought more about what I could really complete in just 20 minutes.  A couple of seams?  But if I did that every day, I might have a completed project in a few weeks’ time.   And that would be one more completed project than when I started. 
 
What if I wanted to make something other than a sewing project?  I decided that as long as I was being productive doing something creative, to would count toward my 20 minutes.
 
This is my chronicle of my 20 minutes a day (or maybe longer if time allows).  Most of it will be sewing, but once in a while I might sneak something else in.  Maybe you will join me for the journey.
 
Michelle